
Unit 2: Introduction to Programming
Activity 1: Creating Java Programs using Eclipse
Learning Goal: By the end of this activity, I will be able to create a simple Java Application using Eclipse, and upload my program to the GitHub website.
Content
 |
Git is a distributed version control system that allows developers to track changes to their code, create backups and share their code in a team environment. GitHub is a web service that hosts Git repositories, plus many developer tools to aid in creating software projects. We will be using GitHub, GitHub Classroom and EGit (part of the eclipse IDE) during this course to create and share assignment repositories. Each student will have a private repository for the activities and assignment associated with each programming unit as well as their RST. |
|---|
- If you haven't already, create an account for yourself on GitHub.com. Use your school-provided email to set up your account.
- When prompted, choose the FREE plan.
- Check your email to VERIFY the email address for your account - you need to do this step!
The Eclipse IDE (Integrated Development Environment)
Eclipse is a program used by many professional programmers, and in many colleges and universities to train people in programming. It was first designed to program Java. It is a very flexible and powerful program that can now be used to program in many different programming languages.It can be used to program in C/C++/C#, Python, Ruby, etc ... by adding available modules to the program. Eclipse is free to download and open-source, which means that anyone can view the code used to create it.
Eclipse is one of many software applications that are to used to develop programs. These applications are called Integrated Development Environments or IDEs. IDEs have a history of their own. Most IDEs contain a text editor to edit the file, a file explorer to organize the source code (the files that contain the programming code) into projects, and various other features that help a developer write programs.
Usually IDEs also either connect to or provide a compiler, allow the developer to trace their code one line at a time, and provide context sensitive help. Eclipse provides a number of features that we will explore of the next few lessons.
HOME COMPUTERS/PERSONAL LAPTOPS: Download & Install Eclipse
ECLIPSE IS INSTALLED ON THE SCHOOL COMPUTER. Use the icon on the DESKTOP to launch Eclipse.
THESE INSTRUCTIONS EXPLAIN HOW TO INSTALL ECLIPSE ON YOUR HOME COMPUTER.
- Use the link on the Resources Page to download Eclipse IDE for Java Developers .
| If you have a PC, watch this video to guide you through the process | If you have a Mac, watch this video to guide you through the process |
The Eclipse Workbench
The Eclipse Workbench consists of three main components: Perspectives, Views and Editors
- Perspectives
- A group of views and editors
- Multiple perspectives can exists in a single Workbench Window
- You can customize a perspective to your workflow needs, or reset it back to its default layout
- Can be chosen from the buttons at the top right of your screen (text optional):

- We will be using the following perspectives in this course:
- Java (for creating and editing code)
- Git (for working with your GitHub repository)
- Debug (for tracing and debugging code)
- Each perspective has its own toolbar, that you can customize to your needs (right click on the perspective button & select customize ...)
- Below is an example showing the Java Perspective, with one editor and multiple views:
- Views
- A visual component within the Workbench
- Used to navigate a list or hierarchy of information, or display properties for the active editor
- Each perspective has a set of views it includes by default, but you can always add your own!
- Select Window > Show View and choose the view you want to add to your perspective
- You can move the views around as needed on your screen by dragging & dropping the view tab
- Some of the views that we will be using:
- Package Explorer: To organize your projects, packages & classes
- Console: To provide user input & view program output
- Outline: To see an overview of the selected class' methods
- Git Repositories: To clone and manage your assignment repositories
- Git Staging: To stage, commit & push your source code files to your Git repository
- History: To view your history of commits
- Variables: While debugging, view the contents of your program variables as you step through your code
- Editors
- Allows you to view & edit source code files (*.java), text files (*.txt), html files, or any other standard Unicode/ASCII file.
- Can have multiple editors open at one; you will see tabs with the filename for each
- A star (*) means that the contents of the editor has been changed, but not saved
- ctrl-s saves the content of the current editor, ctrl+shift+s saves the contents of all editors

GitHub Classroom
|
Hapara evidence card
|
GitHub Classroom is a tool that your teacher will be using to create repositories on your behalf to store the code you will create this year. You will NOT need to make your own repositories - they will be created for you, and each repository will contain ONE Eclipse project to store your work for each unit. You will receive a link to a new repository for each new coding unit in this course. If you haven't already, head back to Hapara to link your GitHub account with GitHub Classroom and accept the Unit 2 Repository. |
|---|

Git Repositories
The following image shows the various commands that you will need to work with GIT for your activities and assignments:

The most important actions are clone/import, pull, and commit/push.
Clone/Import
To clone a repository means to create a local copy of the remote repository (hosted on GitHub) onto your local computer. This creates both the local repository (which tracks changes) as well as the working directory that contains your files. Once this is done you can import your project into Eclipse (though we will use a wizard that does both at the same time!)
Cloning/Importing involves these steps:
- Obtain the URL for your repository from the GitHub website and copy it to the clipboard.

- In Eclipse, select File ... Import
- Select Git ... Projects from Git
- Choose Clone URI
- The next screen should already be populated with your repository information. You will need to provide your GitHub authentication information.
- Under "Authentication", enter your GitHub username and use a classic Personal Access Token (PAT) for the password.
- NOTE: As of August 13, 2021, GitHub requires a personal access token (PAT) to use GitHub with 3rd party applications. You can find instructions on this link to create a CLASSIC PAT and use your PAT in place of your password in Eclipse.
- Choose a custom expiry, and set it up to work for the entire course duration (Check the course calendar to be sure!)
- Give your token repo scope.
- Be sure to check the "Store in Secure Store" in Eclipse so you don't need to re-enter your PAT each time.
- In the "Branch Selection" screen, clear the checkbox for the feedback branch. Only the main branch is needed.

- In the "Local Destination" screen, you can accept the default directory
- Under "Wizard for project import", choose Import existing Eclipse projects

- Click Finish
- Once your project has imported completely, rename your project (F2 or right click Refactor ... Rename) to include your last name (Format: Lastname_ICS3U_Unit2 ).
- Click HERE for a step by step video of the clone/import process.
|
|
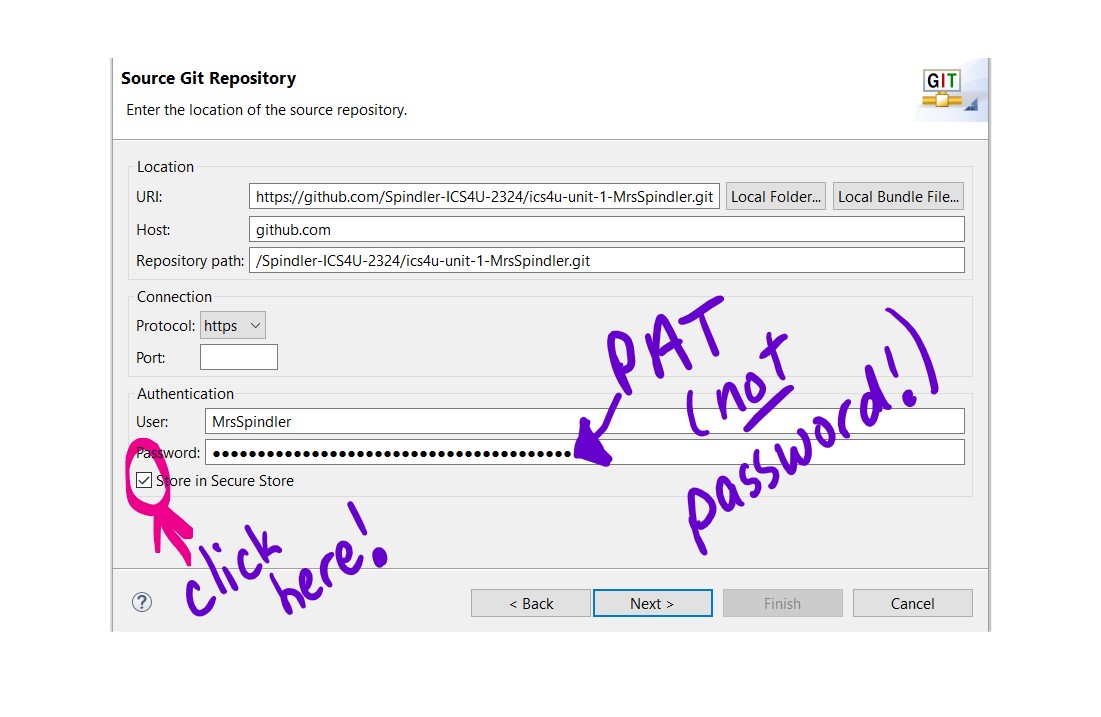
GitHub Authentication
|
|---|
Once your have completed these steps, you should have a copy of the project stored on your computer. You will need to complete this process for every computer that you will use for this course.
Commit/Push
Once you have made some changes to your project, you will want to add those changes to your remote repository. This serves as a backup of your work, allows your teacher to view and assess your work, and gives you the freedom to work from multiple computers. This process involves 3 steps: staging, committing, and pushing.
- To stage your work means that you are preparing to put your changes to the local repository.
- This can be done using the Git Staging view, found in the Git perspective.
- Once your files have been modified, they should appear in the "Unstaged Changes" window.
- Add your files to the index (or Staged Changes list) by dragging and dropping, using the green plus signs, or right click and select Add to Index

- Once your changes have been staged, they are ready to be committed (to the local repository) and pushed (to the remote repository).
- You MUST include a commit message every time you commit!
- If you can't think of a message, ask yourself "Why is it important that I commit right now?"
- Once your comment is entered, select Commit and Push ...
- You MUST include a commit message every time you commit!

- Keep in mind that Commit writes your changes to your local repository, while Push writes the changes to the remote repository (GitHub). For now, we will do both actions together.
- If you accidentally click the wrong button, you can always issue a push command by right-clicking on your repository in the Git Repositories view and selecting Push from the context menu.
- Click HERE for a step by step video of the commit/push process.
Pull
If you switch between computers (home and school) it is CRITICAL that every coding session begin with a "Pull" command. This ensures you are always working on the latest version of your code.
- To issue a pull command, in the Git Repositories view, right click on your repository and select Pull from the context menu

- Click HERE for a step by step video of the pull process
Why Program in Java?
Java is an object-oriented programming language. Object-Oriented Programming (OOP) evolved out of the need to develop complex programs in a systematic, modular approach.
- OOP programmers create modules, called classes that can be used over and over in a variety of programs
- A class groups related data and the instructions for performing actions on that data
- The Java Platform runs on all major operating systems allowing Java applications to run on just about any computer (known as platform-independent applications)
Objects, Classes, Packages & Applications
- OOP development involves selecting objects to perform tasks outlined in program specification
- An object consists of:
- Related data
- Instructions for performing actions on that data
- A class
- Defines the type of data and actions that will be associated with an object of that class (but not the actual data for an individual object)
- Is required to create objects
- A class can be used to create many objects – each object will have the same type of data and possible actions, but each object maintains its own set of data.
")
- A package (sometimes called a library) is a group of related classes
- Here is an illustration of a DVD class and a CD class put into a Media Package:

- A Java Application is a package with at least one class that contains a main() method.

- Classes are importable - an application can use existing classes from another package by using the import keyword
Your First Java Application
The following HelloWorld application is a simple, yet complete, Java program:

The Parts of a Java Application
Statements
- The set of instructions that make up the program
- Each statement ends with a semi-colon ;
- Related statements are enclosed in a curly bracket {}
- In our application the statements are
- package activity1;
- declares a package name, if undeclared it will be default.
- not usually included in simple applications
- import simpleIO.*;
- makes available a library containing some Utility classes, Console and Dialog, for user input and output
- public class HelloWorld
- class declaration
- the class is available to everyone (public)
- it is called HelloWorld, and contained in a file named "HelloWorld.java"
- no objects or actions are defined by the class (we will get to this later)
- it does contain a main method (which is where the program will start)
- public static void main(String[] args)
- defines the main method
- a method is a named set of statements that perform a single, well-defined task
- the method is available to everyone (public)
- it is a class method - doesn't need an object to be created to use it (static)
- it returns no value (void)
- it can optionally accept a list of words as command-line arguments (String[] args)
- Console.print("Hello World");
- Uses the print() method of the Console class to write text to the standard output.
- Click HERE for a step by step video to help your create this Java program.
Comments
- Comments provide information about the program to the reader of the code
- Comments have no effect on how the program runs
- Allow the reader to quickly understand the purpose and logic behind segments of code
- Complex applications are often developed and maintained by more than one programmer, properly commented code allows for easier modifications and can decrease the number of mistakes
- Java programs can contain three types of comments:
- /* */
- Enclose single or multi line comments at the beginning of a program to describe the application or inside to clarify a segment of code
- //
- Used for adding a comment to a specific statement or for a single line comment -- Useful for debugging
- /** */
- Used for documentation
- The javadoc tool copies these comments into a separate HTML document to create an instruction manual or external documentation
- These are appropriate for describing a class or method
 |
Code conventions are a set of guidelines for writing an application. They provide details about commenting, rules for naming methods, classes, and packages, and statement formatting. They make programs easier to read and understand. Organizations that employ programmers often not only encourage the use of code conventions, but require it. Through this course, code conventions will be introduced as needed. It is important that you pay attention to these conventions and use them when you write your code.
|
|---|
Evidence of Learning
 Step by Step
Now it's time to create your first Java Application! Follow these instructions carefully:
- Create a FREE account on GitHub.com and activate the account (they will send you an email with an activation link!)
- Follow the link on the Hapara Evidence Card to create your Unit 2 Repository. When prompted, give GitHub Classroom permissions on your repository.
- Open Eclipse from the DESKTOP using the icon. If you are using a personal computer, follow the steps outlined above
- Once you start Eclipse, the program will ask you to create a workspace.
- Create the workspace in the default location, or a location of your choosing.
- Dismiss the welcome screen and Clone/Import your Unit 2 repository, following the steps outlined above.
- Have you created a PAT yet? You will need a new one for EACH computer you use with this course!
- Don't forget to rename your project!
- You will need to repeat this step for each computer that you use (home/school)
- Inside this project, navigate to the source (src) folder and locate the package named activity1
- Inside this package, create a new Java class (File > New > Class or
 button on toolbar.)
 - Create a simple Hello World program, as show in the code above.
- Save
 & run
& run  your program to ensure it works!
- Open the Git perspective to stage your changes, commit and push to your remote repository, following the steps outlined above.
- Verify on GitHub.com that your new code is there!
- If you switch computers (home/school), don't forget to Pull any new changes into your local repository, following the steps outlined above.